
After accessing the Manage Credit and Enrollment screen (People > Manage Credit and Enrollment), click the Set Filters button on the top toolbar.
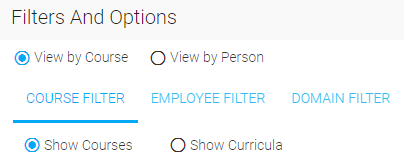
Select the View by Course radio button at the top of the Filters and Options pop-out screen.

The Course Filter tab allows you to select the course you wish to see enrollment data for. If you need to view a course that is contained within a curricula, make sure you select the Show Curricula option at the top of the Course Filter tab.
There are several filters that can be used to assist in easily finding the correct course.
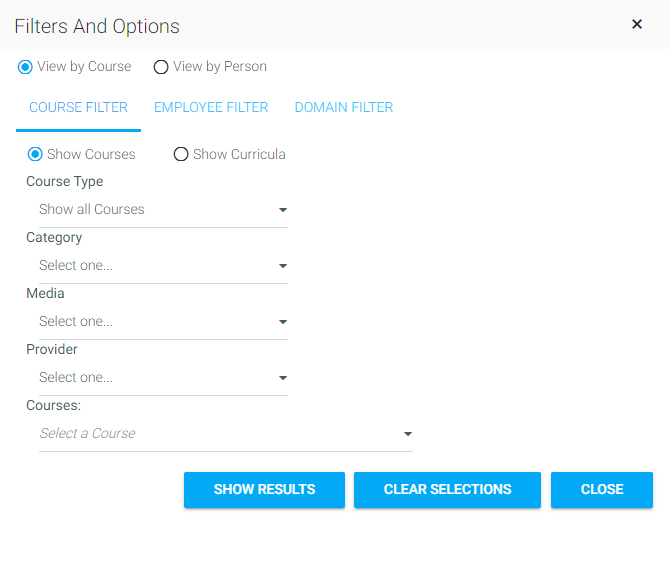
Once the various selections have been made, the Courses drop-down will populate with a list of courses that fit the selected criteria.
For courses contained within a mapping curricula or certificate, first select the Show Curricula option. This will cause the Curricula filters to display. Select the curricula in question from the first drop-down, then select the specific course from the second.

For courses that have audiences both within and outside of a curriculum, if you select the course from the Show Courses list you will see all users’ status in the course without curricula audience information. If you need to know who is part of the curricula audience, be sure to select the Show Curricula option.
If you are searching View by Course, this is an optional filter. If you do not make any selections, you will see the most recent enrollment for all users in the course audience.
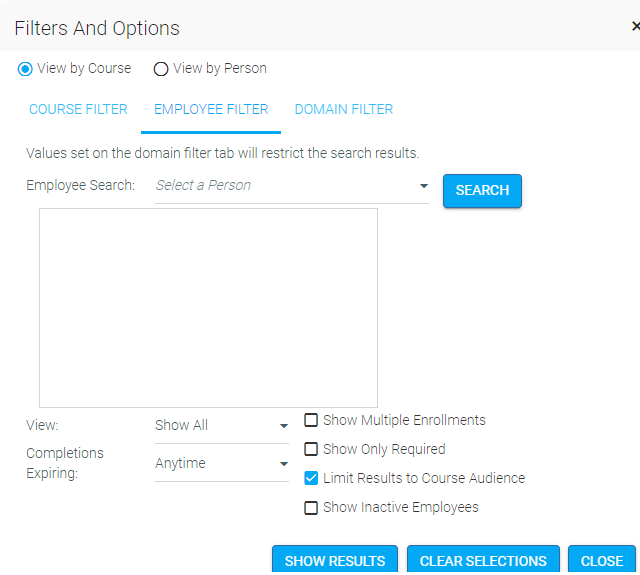
The Employee Search field allows you to narrow your results to one employee. Typically this is left blank when using View by Course option.
The View drop-down allows you to limit your results based on the following criteria:
There are several additional filters you can apply on top of the audience selection.
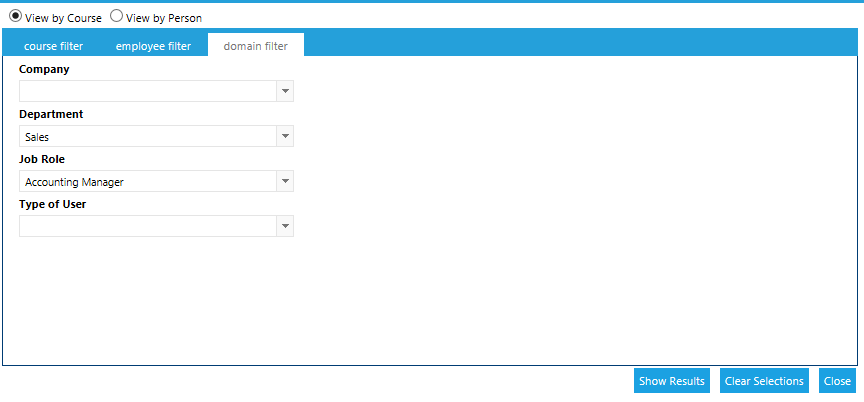
Once the course has been selected, you may choose to narrow down the audience using the domain filter. This is an optional filter. If you do not make any selections, you will see the most recent enrollment for all users in the course audience.
You can use a single filter or combine them to further narrow down your results. If you use more than one filter, the filters combine with an “and”. In the example shown below, your results would only include Account Managers in the Sales department.
Once you have selected your filters, click the Show Results button at the bottom of the screen to proceed to your results.
The Filters and Options pop-up will retain your selections after you leave this screen to work in the Results grid. To ensure that you don’t have any forgotten selections affecting your new results, click the Clear Selections button each time that you need to select new criteria on the Filter and Options pop-up.
Example: On the View by Course option, you use the Domain filter to limit your results to just the Sales Department. After you are done, you decide to switch to View by Person and need to select an employee in the Customer Service Department. If you don’t clear your selections, your Sales Department domain selection will limit your Employee Search to just employees in the Sales Department.
The results of your selections will appear in the Results Grid. Please note that the results are limited to 3000 rows. If your results are greater than 3000 rows, you will need to use the Employee Filter or Domain Filter to limit your results.
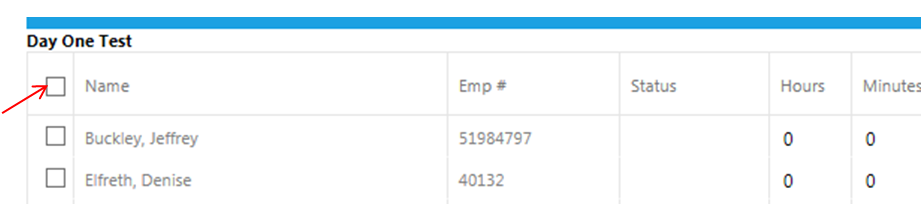
If you have made selections in View by Course, each row of the results grid displays data for one user. Select the checkbox at the far left of each user you want to update enrollment or completion data on.

If you have made selections in the View by Person, each row displays data for one course.

Only the Name/Course column is different. The other columns are the same for each set of results.
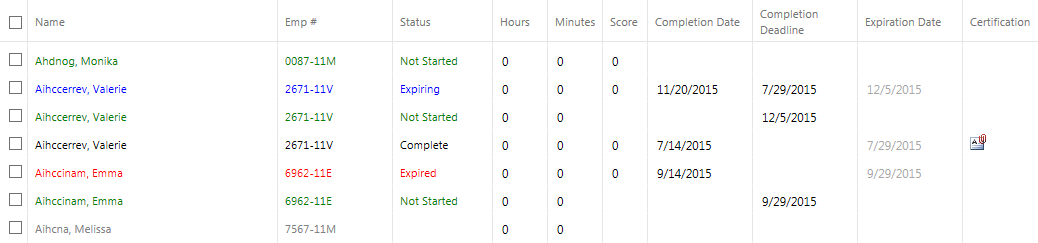
The Status column displays the user's status in a course. Statuses can be grouped in three categories:
The Hours and Minutes columns indicate course length. These can be edited. Score can also be adjusted on this screen.
The Completion date is the date the course was completed, and the Completion Deadline is the date by which the course should be completed. If a course is on a user's Learning Plan due to expiration, this date will automatically be the date that the course is due to expire. These fields can be edited.
The Expiration Date is the date that the previous course completion is due to expire. This field cannot be changed as it is automatically set based on the expiration criteria set at the resource level.
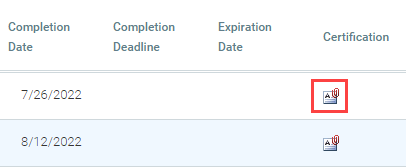
A certificate of completion can only be loaded for a for a user that has a Complete status in the course. To load the certificate of completion, click on the certificate icon next to the user's completion.
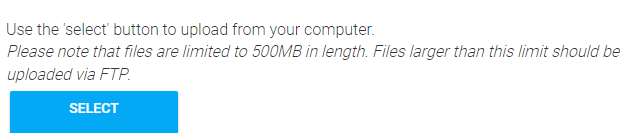
A pop-up will open prompting you to select a certificate to upload. Click Select and navigate to the appropriate document.
As soon as you select the document, the system will automatically upload it. A magnifying glass will now be shown next to the certificate icon indicating that a certificate has been uploaded.

You can click on the magnifying glass to view the uploaded certificate.
If needed, multiple certificates can be loaded for a single employee for the same resource.
If the course already has a default completion certificate associated with it, this certificate will automatically appear in the user's Learning History on the LMS. You do not need to manually upload it. Based on your system configuration, both the default completion of certificate and the manually loaded certificate of completion may be available on the user's history.

The Actions drop-down and the toolbar of the Manage Credits and Enrollment screen allow you to change enrollment and credit data for individuals or groups of users.
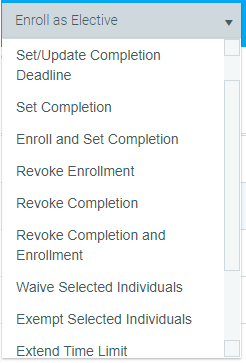
Listed below are the actions that are available in the Action drop-down menu.
The Toolbar Actions options are specific to the View by Person or View by Course filter options. So, the options listed in the Toolbar Actions drop-down menu will vary depending on which filter option (View by Person or View by Course) has been selected.
In addition to the actions drop-down, there is the toolbar that can be accessed at any time. Each item on this top navigation bar is defined below.

A completion certification cannot be deleted once attached to a specific user's completion. If it needs to be deleted, the completion record must be revoked. Once the completion is dropped, the certification will be deleted. The administrator will then need to reset the completion so that course history is not lost.
To upload a completion certification, select the check box at the left of the user's name who you wish to select and click on the Upload Certification button.
The upload box will display prompting you to select a certificate file to upload. The file should be in a PDF format.

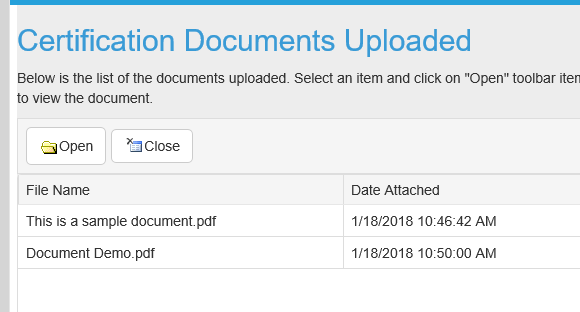
Once the file has been uploaded a magnifying glass will now appear next to the certification icon in the user's data row. If desired, click on the magnifying glass to view the document.

If needed, additional documents can be uploaded using the same steps. A list of all uploaded documents will display when the magnifying glass is selected.
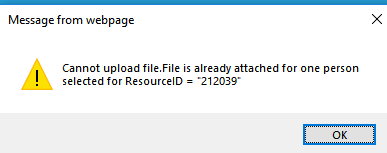
The same certification document cannot be used for multiple users. If you try to upload a certification document that has already been used, the system will stop you.
Follow these steps to set completion for a group of users through the Manage Credit and Enrollment screen.
Go to People > Manage Credit and Enrollment in the administrative menu and select View by Course on the Filters and Options pop-up (this is the default).
Use the Course filters to select the course as described in the Select a Course section mentioned above.
In the Results grid, click the individual check box next to each user for whom you need to set completion.
Remember, if you have some users with a Complete status and other users that have a different status, you cannot process their credit at the same time. You must use two different actions.
Select one of the following from the Actions drop-down menu.
Click on Set Defaults in the top toolbar to set the same completion date and course time for all selected employees. This will open the Set Defaults pop-up window.
Enter the completion date and, if needed, the time that it took to complete the course. If the completion date and time vary by employee, this information can be individually entered into the Results grid.
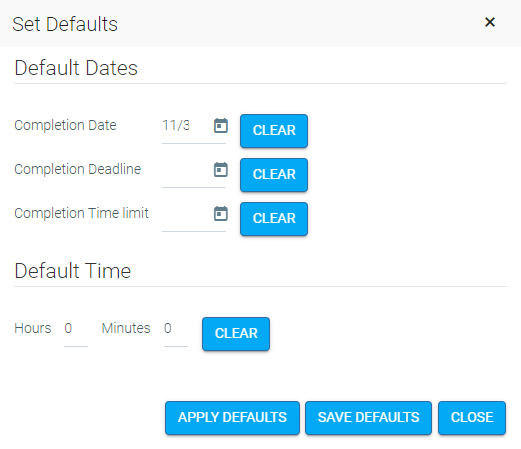
Click Apply Defaults. The completion date and course time should appear in the selected rows of the Results grid.

Click the Save button. You will see a confirmation screen. If the information is correct, click Confirm. If you need to make any changes, click Cancel. Clicking Cancel will take you back to the previous screen so that you can make any necessary changes.
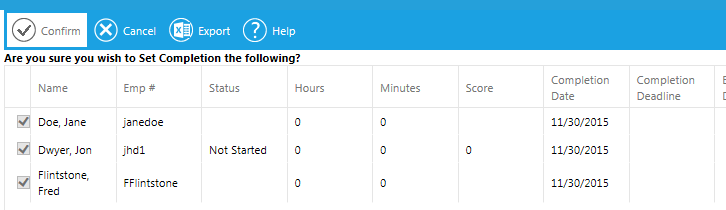
Once you click Confirm, you will be redirected back to the results grid. All of the selected employees' name(s) should now be in black, confirming that they have been granted a completion.
Go to People > Manage Credit and Enrollment in the administrative menu and select View by Person on the Filters and Options pop-up.
Use the Employee Filter tab to select the user as described in the Select a User help screen.
In the Results grid, select the check box next to each course for which you need to set completion.
There are two actions that can be used to grant credit: Set Completion and Enroll and Set Completion.
Click the Save button. You will see a confirmation screen. If the information is correct, click Confirm. If you need to make any changes, click Cancel. Clicking Cancel will take you back to the previous screen so that you can make any necessary changes.
Once you click Confirm, you will be redirected back to the results grid. All of the selected user's name(s) should now be in black, confirming that they have been granted a completion.
There are two available actions can be used to grant credit. They are Set Completion and Enroll & Set Completion. It is important to understand when to use which action to ensure that your training records are properly maintained.
For those users who have do not have a status of “Complete” you should use the Set Completion action to ensure that any current enrollments are updated without creating a duplicate enrollment. If you do not use this action an additional enrollment may be created.
Example: Each of the four users in the screenshot below have a different status for this course, but Set Completion should be used to grant credit for each of them. The statuses are:
The first three users are already enrolled in the course while the last user has never taken the course or been enrolled. If you were to use Enroll and Set Completion for them, this would create a duplicate enrollment for the first three users.

When working with courses that have an expiration period, always check the Show Multiple Enrollments box on the Audience tab of the Filters pop-up. This will allow you to see the automatically created enrollment for users that have the status of Expiring or Expired.
The screenshot below shows the same audience as above, but with the Multiple Enrollments visible. This makes it easy to see the automatically created enrollments. Just remember to only select the Not Started (green) status for users that have the status of Expiring or Expired.
Users who have a status of “Complete” do not currently have the course on their learning plan, so you should use the Enroll and Set Completion action to ensure that a new enrollment is created. If you do not use this action the may be overwritten.
Example: The two users shown below have already taken this course in the past. They just completed a refresher course and now you need to grant them credit. Since they were not previously enrolled in this course, you need to use Enroll and Set Completion. If you used Set Completion, then their previous (i.e. 2015) completion date would be erased

If a user only has a Complete status (black – this includes Waive and Exempt), then use Enroll and Set Completion. For any other color/status, use Set Completion.
Follow these steps to enroll a group of users through the Manage Credit and Enrollment screen.
If there is a prerequisite on the resource, an enrollment through Manage Credit and Enrollment will override the prerequisite.
Go to People > Manage Credit and Enrollment, in the administrative menu, and select View by Course on the Filters and Options pop-up (this is the default).
Use the Course filters to select the course as described on the Select a Course information mentioned above.
In the Results grid, select the individual check box next to each user you want to enroll. If you want to enroll all of the selected audience, check the box located to the left of the Name column in the header row of the Results grid.
Those users indicated in gray with a blank or Not Started status do not currently have the course on their Learning Plan. They are not enrolled in the course. You should only be enrolling users with a “Complete” status (for courses that allow multiple enrollments) or a blank status. All other statuses (including expired and expiring) signify that the employee is already enrolled.
Select one of the following from the Actions drop-down menu.
If you would like for employees to receive an email notification about this enrollment, select the Send Notification check box in the toolbar.

Click on Set Defaults in the top toolbar to set the same completion deadline for all selected employees. This will open the Set Defaults pop-up window.
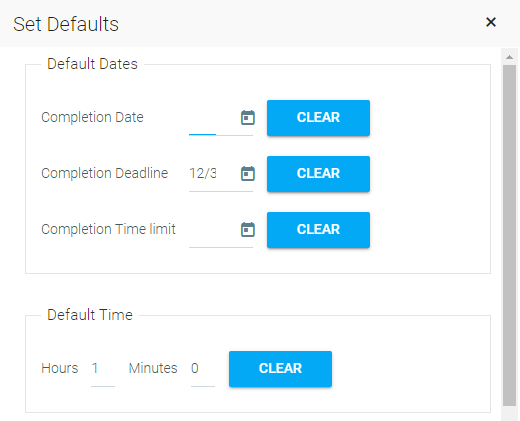
Enter the completion deadline. For enrollment actions, the Completion Deadline field is the only Default information that should be set.
Click Apply Defaults. The completion deadline should now appear in the selected rows of the results grid.

The Completion Date field will automatically populate with the current date. Just ignore this. This date will not be visible on any screen.
Click the Save button. You will see a confirmation screen. If the information is correct, click Confirm. If you need to make any changes, click Cancel. Clicking Cancel will take you back to the previous screen so that you can make any necessary changes.

Once you click Confirm, you will be redirected back to the results grid. All of the selected user’s name(s) should now be in green, confirming that they are now enrolled in the selected course.
